Quantcast
Channel: ethernet – Hackaday
Viewing all 100 articles
Browse latest View live

Display Twitter on an Arduino

$
0
0

If you ever wanted your name out on the Internet, now is your time to shine. [Chris] hooked up an Arduino to the Internet and is streaming the results of combing through Twitter live to the entire world.

The SocialBot9000, as [Chris] calls his build, is an Arduino Uno connected to an Ethernet shield and an LCD character display. The firmware uses the Twitter API to search for recent posts containing the phrase, ‘socialbot9000.’ A PHP script on the Arduino does all the heavy lifting and with the great Bildr tutorial on getting the Ethernet shield up and running, [Chris] was off to the races.

Because it’s extremely doubtful that everyone on the Internet could manage typing a message into Twitter that would be correctly parsed by the SocialBot9000, [Chris] put a small form up on the build log that will correctly generate the message and take you to your Twitter account for posting. After all that was done, [Chris] decided to have some fun and set up a live feed from a camera in front of the LCD display for the world to watch.


Filed under: arduino hacks

Easy workout logging with Ethernet-enabled exercise bike

$
0
0

It will be easy to keep your exercise routine on track if you don’t have to do anything at all to log your workouts. [Reefab] developed this add-on hardware for his exercise bike that automatically logs his workout on the Internet.

He’s using RunKeeper to store and display the workout data. They offer a token-based API which [Reefab] implemented in his Arduino sketch. The hardware to grab data from the exercise bike is quite simple to set up. A rare-earth magnet was added to the fly-wheel with a reed switch positioned next it in order to measure the number and speed of rotations. This is exactly how a consumer bicycle computer works, needing just one accurate measurement corresponding to how far the bike travels with each revolution of that wheel.

In addition to the networked-logging feature [Reefab] included a character display so you can follow your speed and distance data during the workout.


Filed under: home hacks

Twittertape machine keeps track of your social media stock.

$
0
0

During the gilded age, oil magnates, entrepreneurs, and robber barons would have a ticker tape machine in their study. This machine would print stock and commodity prices and chart these men’s assets climbing higher and higher. A lot has changed in 100 years, as now [Adam] can be kept apprised of what @KimKardashian, @BarackObama and @stephenfry ate for breakfast with his Twittertape machine.

Interestingly, [Adam]‘s build didn’t start off as a tarnished lump of 100-year-old brass; he built his beautiful ticker machine out of old clock movements he picked up on eBay. Even though the shiny part of the build only holds the roll of paper, it’s still a wonderful build. Right now the machine is connected to Ethernet, but he’s planning on adding WiFi and a few batteries for a completely wireless build.

Unlike the other ticker tape machine we saw this week, [Adam] did away with the loud clashing of gears and solenoids found in 100-year-old ticker machines. This ticker machine prints on cash register receipt paper and a very small thermal printer in the base. Although [Adam]‘s build doesn’t sound like two robots trading blows, there’s no ink needed and no danger of the letter wheel becoming misaligned and misspelling everything.

Check out [Adam]‘s build in action after the break.

via reddit


Filed under: classic hacks

Ethernet over telephone wire

$
0
0

When [Bobo1on1] upgraded his Internet connection from ADSL to Fiber he ran into an issue of actually getting that speed to his desktop computer though his LAN setup. Before he had been using a telephone extension wire which ran from where the DSL entered the house, through a splitter, to his computer where the modem was located. Now that the router used by the fiber system is located at teh entry point, he has no easy way to run Ethernet cable to his computer room. Wifi is predictably slower than the 50mbit WAN connection, and he was unable to use the telephone cable as Ethernet directly.

The solution turns out to be a pair of TP-Link home plug adapters. These are designed to use your home’s mains wiring for data transfer. But [Bob] rigged it up so that they can push 224 mbits/sec over the telephone wire. Since you can’t run mains voltage through the telephone wire he had to hack a method to separate power for the devices from the data I/O. This was done with an external power supply and some passive components for filtering. The drawback is that this is half-duplex so up/down communications cannot happen at the same time.


Filed under: home hacks

CoolBot keeps your laser cutter from overheating

$
0
0

[Charles] wrote in to share the project he just built for the London Hackerspace. He calls it CoolBot, and as the name indicates it’s responsible for keeping the laser cutter from overheating.

At its heart the system is a water pump. It uses a plastic storage container as a reservoir, with an outfeed from the laser tube coming in the top of the lid. [Charles] mounted a temperature sensor using a 3D printed part to anchor it in the center of the return stream. An Arduino clone uses this sensor, as well as ambient room temperature and laser tube temperature sensors to decide when to switch on the cooling pump. As with any hackerspace add-on, this wouldn’t be complete without Internet connectivity so he included an Ethernet shield in the project box. Speaking of, that box uses panel-mount connectors to keep dust and water away from the electronics. But the lid of the controller box also includes a character LCD for quick reference.

Don’t miss [Charles'] explanation of the system in the video after the break.


Filed under: Hackerspaces, laser hacks

Hackaday Links: April 29, 2012

$
0
0

More old computers on FPGAs!

[Andy] loves his Memotech MTX computer. It’s an oldie with a Z80 running at 4MHz; the perfect target for an FPGA port. The ReMemotech has everything the old one has – cassette interface and all – and can run up to six times faster than the original.

Also found in 10-forward

If you’re going to build a jukebox, why not go all out? Here’s a touch screen jukeboxwith an LCARS skin. Yep, the same interface found on Star Trek: The Next Generation.

New desktop wallpaper for you

[McMonster] found a great pair of blog posts (1, 2) showing what ancient ICs look like without their casing. Since these were CERDIP packages (two ceramic plates glued together) they were exceptionally easy to take apart leaving the entire chip intact. Pages are in Polish, but there’s a Google Translate button on the sidebar

Cheap and easy Arduino wi-fi

Quick quiz: what’s the easiest way to get data onto an Arduino wirelessly? XBees? GSM modules? Nope, just get a wireless router and an Ethernet shield. The Ethernet module only cost [Doss] $20, and we’re sure Hackaday readers have a spare wireless router around somewhere.

Chiptunes! Chiptunes I say!

[mdmoose29] has been working on making a custom SNES cartridge for a dubstep artist (tell us more, [moose]…). In his search for programming tools, he found theSNES Game Maker. We tried it out for a bit and it’s still a very unrefined beta. Still, making SNES programming easier is awesome.

You people are awesome. Here’s six things for a links post.

[Valentin] made a night vision monocular from an old VHS camcorder, a small spy camera, and a handful of infrared LEDs. Here’s a video of [Valentin]‘s build in action.


Filed under: Hackaday links

Using the Raspi as an Ethernet shield

$
0
0

[Alexandre] wanted to set up a web-based temperature logger with his Arduino, but found the Arduino Ethernet shield a little finicky. Since his Raspberry pi was just delivered, he figured he could use the Raspi as an Ethernet shield with just a little bit of coding.

After [Alexandre] set up his Arduino to send a thermocouple through the USB, the only thing left to do was to add node.js to the Raspi’s Debian installation. Every five minutes, the Arduino wakes up, takes a temperature reading, and sends it over to the Raspberry pi. From there, it’s easy parse the Arduino’s JSON output and serve it up on the web.

In the end, [Alexandre] successfully set up his Raspberry pi as an Ethernet shield to serve a web page displaying the current temperature (don’t F5 that link, btw). One interesting thing we have to point out is the cost of setting up this online temperature logger: the Arduino Ethernet shield sells for $45 USD, while the Raspberry pi is available for $35. Yes, it’s actually less expensive to use a Raspberry pi as an Ethernet shield than the current Arduino offerings. There you have it, just in case you were still on the fence about this whole Raspi thing.


Filed under: arduino hacks, Raspberry Pi

Cheap as chips Arduino Ethernet shield

$
0
0

It’s no secret that Ethernet shields for the Arduino are a little expensive. With the official Ethernet shield selling for about $50 and other options not much cheaper, there’s a lot of room for improvement for Arduinofied Ethernet. [Boris] over at Open Electronics has a solution to this problem: his Ethercard powered by a $3 Ethernet controller.

The Ethercard uses the Microchip ENC28J60, a through-hole Ethernet controller. There isn’t much else on the board apart from an RJ45 jack, caps, resistors, and a cheap buffer chip. This board was designed to be easily produced, and we’re thinking it might be possible to etch this board at home.

There are a few drawbacks to this ENC28J60 Ethernet shield – the official Arduino Ethernet shield has a 10/100 Mbps connection where the Microchip-powered shield is limited to 10 Mbps. Given the reduced cost, ease of assembly, and the fact that it’s pretty hard to saturate a 100Mbps connection with an Arduino this flaw can be easily ignored.

Pretty neat, especially considering how much you can do with an Ethernet connection on your Arduino. Files and code available in the git.


Filed under: arduino hacks, hardware

Remote uploading to an Arduino with codebender

$
0
0

A few weeks ago, we saw codebender, an online replacement for the Arduino IDE that allowed you to upload a sketch to your board from a web browser. Over on the codebender blog [Vasilis] and his team are rolling out a way to remotely upload code to an Arduino over Ethernet. Now you don’t even need a serial connection to program an Arduino; it can be done over the Internet to a board in the next room, or on another continent.

The star of this hack is the Ariadne bootloader, an implementation of TFTP that allows any Ethernet-enabled Arduino to receive updates over the Internet. There is still one small problem with the Ariadne bootloader: uploading code over Ethernet requires someone to press the reset button on the Arduino, completely negating the benefits of programming an Arduino over Ethernet.

This problem has been solved before for earlier Arduino boards, so we’re sure [Vasilis] and his team will be able to fix the reset issue in very short order. If you’d like to check out the remote TFTP bootloader and play around with codebender, you can grab Ariadne over on GitHub.


Filed under: arduino hacks, Software Development

Traffic lights tell you when your Xbox Live friends are gaming

$
0
0

It sounds like [Andrew] is trying to build a Pavlovian response into his behavior when it comes to online gaming. He wants to make sure he doesn’t miss out when all his friends are online, so he built this traffic signal to monitor Xbox Live activity. It will illuminate the lights, and drive the meters differently based on which of his friends are currently online. When the light’s green, he drops everything a grabs a controller.

The base of the light is a black project box. Inside you’ll find the Arduino compatible chip which drives the device mounted on a piece of protoboard. A WIZnet W5100 adds network connectivity at the low price of around $25. There is one problem with the setup. The API which [Andrew] found doesn’t use any authentication. This means that he can only see the public status of his friends; anyone who has set their online status set to private will always register as ‘online’. If you know of an existing Xbox Live API that would solve this issue we’d love to hear from you in the comments.


Filed under: xbox hacks

Hackaday Links: December 5, 2012

$
0
0

PS1 hombrew competition

code

The PlayStation Development Network is hosting a six-month long competition to develop homebrew games for the original PlayStation.We don’t get many homebrew games for old systems in our tip line, so if you’d like to show something off, send it in.

This is how you promote a kickstarter

snes

[Andy] has been working on an SNES Ethernet adapter and he’s finally got it working. Basically, it’s an ATMega644 with a Wiznet adapter connected to the second controller port. The ATMega sends… something, probably not packets… to the SNES where it is decoded with the help of some 65816 assembly on a PowerPak development cartridge. Why is he doing this? To keep track of a kickstarter project, of course.

What exactly is [Jeri] building?

jeri

[Jeri] put up an awesome tutorial going over the ins and outs of static and dynamic flip-flops. There’s a touch of historical commentary explaining why dynamic registers were used so much in the 70s and 80s before the industry switched over to static designs (transistors were big back then, and dynamic systems needed less chip area). At the end of her video, [Jeri] shows off a bucket-brigade sequencer of sort that goes through 15 unique patterns. We’re just left wondering what it’s for.

Finally, a camera for the Raspberry Pi

camera

In case you weren’t aware, the camera board for the Raspberry Pi will be released sometime early next year. Not wanting to wait a whole month and a half, [Jouni] connected a LinkSprite JPEG serial camera to his Raspberry Pi. The whole thing actually works, but [Jouni] didn’t bother posting the code. Maybe we can encourage him to do so?

Blatant advertising? Yes, but fireballs

Nintendo gave [MikenGary] a Wii U and asked them to make a film inspired by 30 years of Nintendo lore and characters. They did an awesome job thanks in no small part to Hackaday boss man [Caleb](supplied the fire), writer [Ryan] (costume construction) and a bunch of people over at the Squidfoo hackerspace.


Filed under: Hackaday links

Raspberry Pi Hacking, Commando Style

$
0
0

raspberry-pi-and-notebook

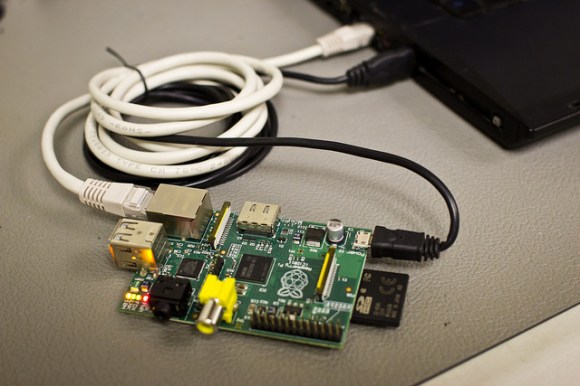
If you’re lacking useful equipment for your Raspberry Pi hacking adventure, such as an HDMI monitor or power supply, this handy write-up will show you how to continue your hacking. All you’ll need is a laptop, the Raspberry Pi itself, an SD card, and an Ethernet and micro-USB cable. As noted in the article, it’s not really recommended to power the ‘Pi off of USB only, so this could potentially be a source of problems.

This hack begins by installing Linux on an SD card per this setup page, then using a Virtual Network Computing [VNC] setup to work with your Raspberry Pi. There are a few steps in between being able to do this, like setting up network sharing, and sleuthing out the IP address of the new processor, but everything is explained in detail for Mac and Linux. Windows users will have to do a bit of “sleuthing” of their own, but if you have some more information on this process, we’d love to hear about it in the comments!


Filed under: Raspberry Pi

Sump pump monitor emails and raises alarm if water rises

$
0
0

sump_pump_overview

[Matt] literally finds himself in a sticky situation. There’s an oil slick in his sump well. These wells work in conjunction with drain tiles to pump water away from the foundation of a house. Unfortunately the tar that was used to waterproof the outside of his foundation is also washing into the sump and gumming up the works. The system he built will sound an audio alarm and send an email if something goes wrong with the sump pump.

He’s monitoring for two different issues. One technique uses a float valve to sense if the water is too high, signalling that the mechanism controlling the pump has malfunctioned. The other is a current monitor that senses if the sump pump has been running too long (caused by the sump’s water sensor getting stuck in the on position). The one thing he didn’t want to do is control the pump directly as a bug in his code will easily result in a flooded basement. We have the same concerns when considering building a DIY thermostat (an error there could mean frozen water pipes leading to flooding).


Filed under: home hacks

Cracking open a 24-port switch so you don’t have to

$
0
0

hp-procurve-ethernet-switch-teardown

[Kenneth Finnegan's] post about this 24-Port HP ProCurve 2824 Ethernet Switch teardown was a delight to read. He’s taking an introduction to networking class at California Polytechnic State University. One of their labs included virtual machines shooting thousands of new MAC addresses at the thing all at once. Despite it’s ability to switch data at a blazing fast rate, it’s ability to deal with that many new hardware identifiers was less than impressive. He wanted to find out why and it just so happened he had one of these in his parts bin at home (which he refers to as if it’s a high-powered RPG character).

The mainboard is divided into three major blocks: the power supply, the switching hardware, and the processor that makes this a manged switch. Although he covers all of these pieces (and the switching stuff is very interesting to learn about) it is the processor section that was causing the aforementioned slowdown. It’s a 266MHz PowerPC chip with a measly 64 MB of RAM. Of course this doesn’t need to be any more powerful since all traffic from previously ‘learned’ MAC addresses gets handled by the switching block and never touches the processor portion.

Don’t miss the end of his post where he discusses how the filtering caps, and semi-isolated ground planes help to tame the beast created from all of this high-speed switching.


Filed under: Network Hacks, teardown

UDP between STM32-F4 Discovery boards

$
0
0

stm32-f4-udp

[The Backwoods Engineer] tested out a new accessory kit for the STM32-F4 Discovery board. The image above shows two boards communicating with the UDP protocol. Notice the extra PCB into which each Discovery board has been plugged. This is a third-party add-on which adds Ethernet, RS-232, SD card slot, and a connector for LCD or Camera. We’ve had one of these F4 Discovery boards on hand for a while and haven’t figured out a good way to connect external hardware to the huge dual pin-headers. This doesn’t solve the problem — the base board also includes dual headers to break-out all the pins — but having Ethernet, serial, and SD certainly reduces the need to add all that much more. The other drawback to the hardware is that the sample firmware is targeted at the IAR Embedded Workbench which is neither free, nor in the realm of affordable for hobbyists.

The NIC used on the baseboard has auto-crossover capabilities so the boards were connected using a regular Cat6 patch cable. This example has the boards constantly sending UDP packets with the module on the right reporting status information to a terminal via the serial connection.


Filed under: ARM, Network Hacks

Comparing USB to Ethernet converters: Apple vs. Knock-off

$
0
0

usb-ethernet-comparison

[Angus Gratton] recently cracked open a pair of USB to Ethernet converters to see what’s inside. One was an Apple branded device, the other a no-name from eBay. The former rings in at $30, with the latter just $4. This type of comparison is one of our favorites. It’s especially interesting with Apple products as they are known for solid hardware choices and the knock-offs are equally infamous for shoddy imitations.

From the outside both devices look about the same. The internal differences start right away with a whole-board metal shield on the Apple dongle and none on the off-brand. But the hardware inside is actually quite similar. There’s an RJ-45 jack on the left, followed by the Ethernet isolation chip next to it. From there we start to see differences. The off-brand had a blank chip where Apple’s ASIX AX88772ALF USB to Ethernet bridge controller is located. There is also a difference with the clock; Apple is using two crystals with the other using just one.

[via Reddit]


Filed under: teardown

Turning a router into an Arduino shield

$
0
0

shield

[Dirk] had a problem: while he already had an Arduino with an Ethernet shield, he needed WiFi for an upcoming project. Running a Cat5 cable was out of the question, and a true Arduino WiFi shield is outrageously expensive. He did, however, have a WiFi router lying around, and decided it would make a perfect WiFi shield with just a little bit of cutting.

The router [Dirk] used was a TL-WR702N, a common router found in the parts bins of makers the world over. Inspiringly, the size of the router’s PCB was just larger than the space between the Arduino’s pin headers. Turning the router into a shield is simply a matter of scoring the edge of the board and gluing on a few pins for mechanical strength.

Power and ground lines were soldered between the pin headers and the router, while data is passed to the Arduino and Ethernet shield through a short cable. It may not look pretty, but if it works in a pinch we can’t complain.


Filed under: Arduino Hacks

Building an ethernet connected RFID reader

$
0
0

For the last few years, [Lt_Lemming] was the president of Brisbane’s hackerspace. Until several months ago, access to the local was done using 125KHz RFID tags and an Arduino board with a prototyping shield. As the hackerspace gained members and moved to bigger facilities, [Lt_Lemming] decided to build himself a more compact and advanced platform.

His Simple NetworkAble RFID Controller (SNARC) is a platform which can be connected to an Ethernet network and different RFID readers in order to implement smart access control functionalities. Through hole components were selected so even solder apprentices may assemble it. The PCB was designed using Fritzing, and development can even be done inside the Arduino IDE as ISP and serial headers are available on the board. Finally, an N-channel mosfet controls the door locking mechanism.

The project is open hardware and software, and all the sources can be downloaded from [Lt_Lemming]‘s github repo.


Filed under: hardware, Network Hacks

SNESoIP: It’s exactly what it sounds like

$
0
0

prototype-small

Here’s a cool hack for those of you wishing to play some retro multiplayer SNES games online!

[Michael Fitzmayer] is a resident hacker at shackspace; der hackerspace in StuttgartHe’s come up with this clever little ethernet adapter network-bridge that can share local controller-inputs over the internet. The entire project is open-source, and readily available on github. It’s still in the early stage of development, but it is already fully functional. The firmware is small and will fit on an ATmega8, and by the looks of the component list it’s a fairly easy build.

He’s even integrated a switch mode (hold B and Y during boot), which avoids trying to figure out which controller will be player one! After all, don’t you remember untangling the controller cords, trying to figure out which one is which?

We know you had a favorite controller and would give the other “crappy” one to your guest.

Example video is after the break.

[Thanks Hadez]


Filed under: Network Hacks, nintendo hacks

Pokewithastick, an Arduino programmable web-logger/server

$
0
0


[Stewart] tipped us about his very nice project: pokewithastick. It is an Arduino compatible board (hardware, not footprint) based on the ATMEGA1284P which can be programmed to collect and post data to internet logging sites such as Thingspeak or Xively.

As you can see in the picture above, it has a small 50x37mm footprint (roughly 2″x1.5″). The pokewithastick is composed of an Wiz820 Ethernet module, a micro-SD card slot, 2 serial ports, one battery backed Real Time Clock (RTC), one radio connector (for the usual nRF24L01 2.4GHz radio), one power & user LED and finally a reset button. There are two power rails on the board which can be split (5v + 3.3V) or combined (3.3v only) which may allow you to connect Arduino shields to it. You can program the board using the standard 6-pin header or via a serial programmer if an appropriate (Arduino) bootloader is installed.

The project is open hardware, has been designed using Kicad and all the files can be downloaded as a zip file.


Filed under: Arduino Hacks, hardware
Viewing all 100 articles
Browse latest View live


<script src="https://jsc.adskeeper.com/r/s/rssing.com.1596347.js" async> </script>